Wixey WR510 Digital Planer Readout with Fractions
Replace the inaccurate stock height gauge on your portable planer and stop constantly using calipers to check stock thickness! Most digital calipers only read out in decimal measurements, forcing you to do the mental math to convert to fractions. If your stock is measuring .575″ and you need 9/16″, how much do you need to
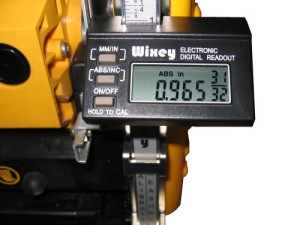
Replace the inaccurate stock height gauge on your portable planer and stop constantly using calipers to check stock thickness! Most digital calipers only read out in decimal measurements, forcing you to do the mental math to convert to fractions. If your stock is measuring .575″ and you need 9/16″, how much do you need to remove with your next pass through the planer? With the Digital Planer Height Gauge simply lower your planer until the gauge reads .565 – 9/16. It cant get any easier! Unique gauge reads out both decimal and fractional measurements. Fits most portable “lunch box” style planers. Easy to follow installation instructions.
Product Features
- Fits most portable planers
- Easy to install, calibrate, and use
- Displays Inches with fractions or millimeters
- Large easy to read display angled for easy viewing


Affordable Precision for your planer I installed this unit on a 1995 Powermatic 180 – a large 18″ x 6″ capacity, stationary planer. It involved fabicating a few brackets but it was fairly simple once you understand how the unit “reads” changes in depth.On most portable planers the cutter head is raised and lowered in relation to a fixed bed – this is how the Wixey’s supplied brackets were designed to be used. On stationary planers like mine the cutterhead is fixed and the bed is moved up and down to change the depth of cut.Basically, the Wixey readout moves up and down the scale which is typically “fixed” on a portable planer; on a stationary planer, like the Powermatic, it’s easier to mount the unit on the left side, by attaching the scale with a bracket under the gib screws – in this installation, the scale moves up and down with the bed and the Wixey readout is fixed. Maybe this explanation is not clear but it’s the best I can come up with -I’ll try and post a photo which will help…
Easy to install on DW735 — here’s my install notes I love it! This is far more useful and easier to zero out than I expected. I thought it just told me the height setting absolute or with incremental changes. Little did I know that I could also take a piece of wood freshly planed, lift up the gauge and get an absolute measurement of the board’s thickness too. Which then answered my question about how to zero it out. Just hit the button with that board in place and it is zeroed.The instructions are horrible and there’s different pieces in there to accommodate different types of planers. I was a bit anxious at first, but In the end it was easy and I only had to drill 2 small holes, and reused 2 which were already there.Here is what worked for me.Secure the Main Back Bracket over the old ruler:1. I took the spring off the gauge, pulled the ruler and the gauge off the back mounting plate. It makes it easier to install since you can clearly see the holes and stuff.2. Take the red…